
There is a distinct, visceral dread that settles in when the water in your toilet bowl begins to rise instead of receding. In that high-pressure moment, the instinct is to grab a plunger, pump frantically, and pray for a miracle. Often, however, the clog remains stubbornly in place. Before you resign yourself to an expensive emergency call-out fee and the humiliation of a "plumbing emergency," there is one essential tool that every homeowner should have in their arsenal: the closet auger.
Learning how to navigate a plumbing blockage using a snake is one of the most empowering skills a homeowner can acquire. It is a process that typically takes less than fifteen minutes, costs a fraction of a professional plumber’s hourly rate, and reaches deep, recalcitrant clogs that even the most robust plunger cannot touch.
The Anatomy of the Blockage: Understanding the Tools
What is a Plumbing Snake?
A plumbing snake—technically referred to as a drain auger—is a flexible, coiled metal cable housed within a hollow shaft. At the tip, you will find a specialized corkscrew or curved fitting designed to either break up, hook, or retrieve the obstruction causing the backup.
The Critical Distinction: Standard Snake vs. Closet Auger
A common mistake made by novices is assuming all "snakes" are created equal. While standard drain snakes are excellent for hair-clogged shower drains or kitchen sinks, they are entirely inappropriate for toilets.
Using a standard plumbing snake in a toilet is a recipe for disaster. The sharp, metal tip of a standard snake can easily scratch, crack, or permanently chip the delicate porcelain finish of your toilet bowl. Furthermore, these tools lack the protective casing necessary to navigate the complex "S-bend" (or trapway) of a toilet.
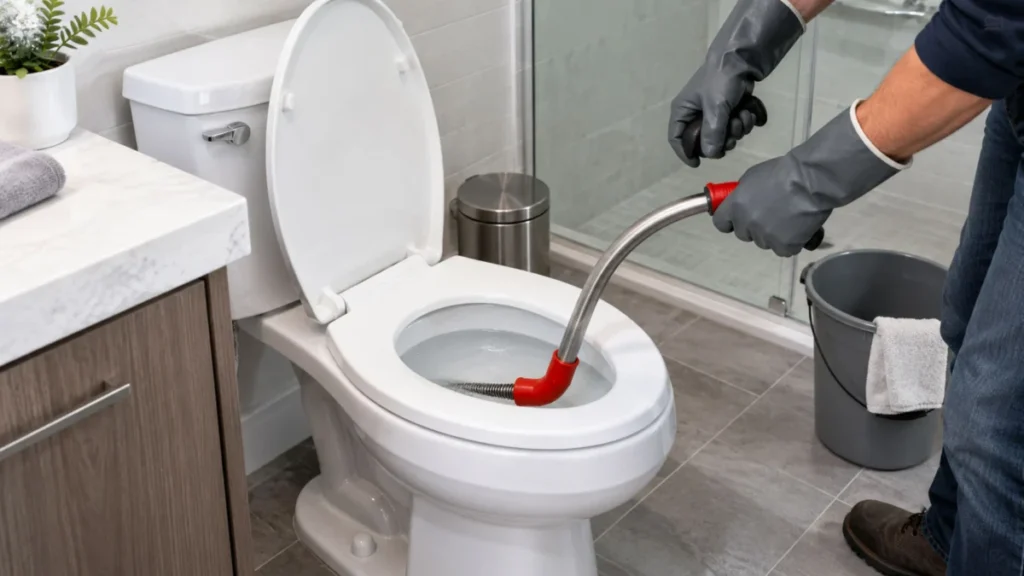
Instead, professionals rely on a closet auger. This tool is specifically engineered for the unique geometry of a toilet. It features a protective rubber coating—often called a "guide"—that acts as a bumper, shielding your porcelain from damage while the flexible cable maneuvers through the trap. As plumbing expert Richard Trethewey of This Old House famously advises: always try a funnel-cup plunger first, but if the clog persists, a closet auger is the only responsible next step.
Preparation: The Logistics of the Fix
Before you initiate the repair, preparation is paramount. Plumbing work is inherently messy; failing to set up your workspace beforehand often leads to a frantic search for supplies while water is actively spilling onto your floor.
Your Essential Supply Checklist
- A High-Quality Closet Auger: Ensure it is specifically rated for toilet use.
- Disposable Gloves: Nitrile or heavy-duty rubber gloves are non-negotiable for hygiene.
- Old Towels or Drop Cloths: Lay these down around the base of the toilet to catch any accidental splashes.
- A Bucket and Rags: Keep these on standby to manage any overflow.
- A Flashlight: Even in well-lit bathrooms, you need to see exactly where the cable is entering the trap.
Step-by-Step Execution: How to Snake Your Toilet
1. Positioning the Auger
Begin by retracting the cable fully into the housing. Insert the head of the auger into the toilet bowl, directing it toward the opening of the trapway at the bottom of the basin. The curved end of the auger should naturally align with the drain path.
2. The Feeding Process
Hold the handle firmly and begin to turn the crank clockwise. This motion will extend the cable into the trap. You will feel a natural resistance as the cable rounds the bend. Do not force it; if you feel an abrupt stop, rotate the handle in the opposite direction to help the head bypass the obstruction.
3. Contact and Extraction
Once you reach the blockage, you will feel a firm "thud" or increased tension. Continue to crank the handle, applying gentle pressure to either break the obstruction into smaller, flushable pieces or to hook it securely so it can be pulled back out.
4. Retraction and Inspection
Slowly pull the cable back into the housing. If you have successfully hooked the debris, it will emerge with the tip of the auger. Remove the debris, dispose of it in a waste bin (do not re-flush it), and repeat the process if you suspect further blockage.
5. The Test Flush
Once the obstruction is cleared, flush the toilet. If the water drains at a normal velocity, you have succeeded. If the water level remains high, you may need a second pass or to reconsider the nature of the blockage.
Common Pitfalls to Avoid
Even with the right tools, amateur plumbers often fall into traps that exacerbate the issue.
- Aggressive Forcing: The most common mistake is forcing the auger. If the cable won’t move, you are likely hitting the back of the porcelain trapway. Forcing it can crack the bowl, leading to an expensive replacement.
- Ignoring the "Flushable" Myth: Many users believe that items labeled "flushable" are safe. In reality, these wipes are the primary cause of modern, deep-pipe blockages. Never flush them.
- Using Chemical Cleaners Simultaneously: Never use harsh chemical drain cleaners while attempting to snake a toilet. If the snake splashes, the chemicals can cause severe burns to your skin.
When to Call in the Professionals
While DIY methods are highly effective for standard clogs, there are scenarios where the problem exceeds the capabilities of a homeowner’s toolkit.
Call a plumber immediately if:
- Multiple Fixtures are Backing Up: If your sink gurgles when you flush the toilet, or if water bubbles up in the shower, you likely have a blockage in your main sewer line. This is a complex structural issue that requires industrial-grade machinery.
- Persistent Sewage Odors: If the room smells of sewage even after the water drains, there may be a vent pipe issue or a broken seal in the plumbing stack.
- Water in Unexpected Places: If you see water seeping from the base of the toilet or appearing in other parts of the house, stop using the water supply immediately.
Professional plumbing services can range from $100 to $300 per hour depending on the region. Given this cost, the investment in a $30 to $50 closet auger pays for itself with just one successful DIY intervention.
Prevention: The Long-Term Strategy
The best way to fix a toilet is to ensure it never clogs in the first place.
- Adhere to the "Three Ps": Only Pee, Poo, and (toilet) Paper should ever enter the bowl. Anything else, including cotton swabs, dental floss, or sanitary products, belongs in the trash.
- Hard Water Management: If you live in a hard water area, mineral deposits (calcium and magnesium) can accumulate inside your pipes over time, creating a rough surface that catches debris. Periodic descaling using white vinegar or specialized plumbing treatments can keep your pipes smooth.
- Routine Maintenance: Once a month, pour a bucket of hot (not boiling) water into the bowl from waist height. The sudden force of the water can help clear minor build-ups before they harden into a total blockage.
Final Thoughts
Snaking a toilet is a rite of passage for every homeowner. It is not the most glamorous chore, but it is an essential one. By keeping a closet auger in your garage and understanding the mechanics of your drainage system, you maintain control over your home environment.
Once the plumbing is restored to its proper function, the peace of mind is well worth the fifteen minutes of effort. For those looking to further their knowledge of home maintenance, resources like Home Comfort Experts provide invaluable insights into everything from bathroom renovations to seasonal home care. Whether you are performing an emergency fix or planning a full-scale remodel, being informed is the ultimate key to a happy, functional home.